Last updated: November 28, 2019 17:26
RasClock is a highly accurate real-time clock that fits on any (May 2016) version of the Raspberry Pi and uses a battery backup to retain the time.
All versions of RasClock are functionally identical and all are built in the UK. Currently v4.x and v5.0 are being manufactured.
RasClock uses one of the following chips:
All of these have the following features:
- Very accurate timekeeping (typically ±3ppm or <2 minutes deviation per year).
- Integrated crystal that compensates for temperature and age.
- A 36mA 3V CR1220 battery will keep the time for around two years if the device isn't used and considerably longer if it is.
Installing the clock
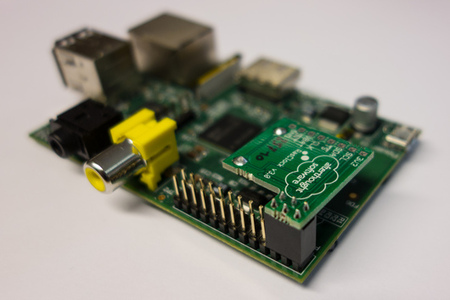
- Insert the backup battery (CR1220) into the RasClock. Ensure that the battery is inserted correctly with the positive terminal of the battery (marked +) facing away from the RasClock PCB. (Note that on the v5.0 of the RasClock the battery clip has a less obvious + marked on it but the polarity is the same as previous versions)
- The module is installed directly into the GPIO header at the corner of the Raspberry Pi. It uses the 3.3V, GND SDA and SCL pins. The module stays within the outline of the Raspberry Pi and sits lower than video output so it should fit within most cases.
Setting up on Raspbian
The Raspbian versions, Wheezy, Jessie and Stretch already support the RasClock. First ensure this is up to date:
sudo apt-get update && sudo apt-get upgrade
Two changes then need to be made:
1. Edit the file /boot/config.txt
If your system has the file /boot/overlays/i2c-rtc-overlay.dtb or /boot/overlays/i2c-rtc.dtbo.To enable this add the following line to /boot/config.txt:
dtoverlay=i2c-rtc,pcf2127
If your system has the file /boot/overlays/pcf2127-rtc-overlay.dtb. To enable this add the following line to /boot/config.txt:
dtoverlay=pcf2127-rtc
After restarting your Raspberry Pi the RasClock should be recognised and you can control it with the hwclock command.
2. Edit the file /lib/udev/hwclock-set
Raspbian Wheezy: (Release 2015-02-16 and perhaps others) you will also have change the two occurrences of --systz to --hctosys
This is due to a change in the underlying debian release. Here is a debian report on the issue.
Raspbian Jessie/Stretch:
- Comment out or remove the three lines
if [ -e /run/systemd/system ] ; then
    exit 0
fi
- Comment out or remove the two lines which contain
--systz
Getting and Setting the time
The first time you use the clock you will need to set the time. To copy the system time into the clock module:
sudo hwclock -w
To read the time from the clock module:
sudo hwclock -r
To copy the time from the clock module to the system:
sudo hwclock -s
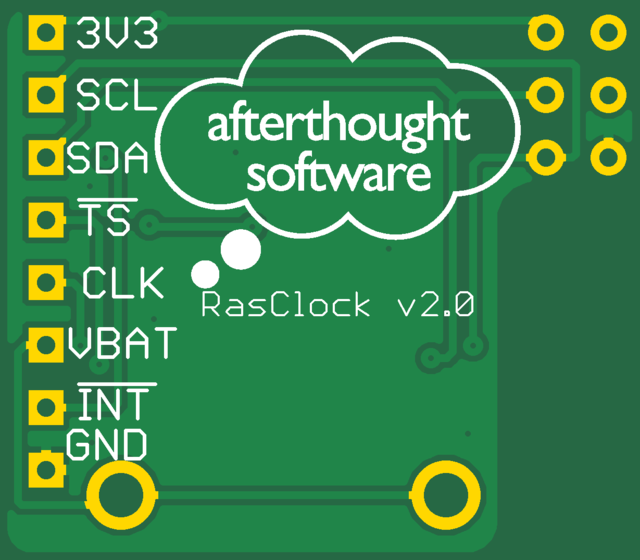
Version 2.0 silk-screen
For version 2.0 of RasClock there was no annotation printed onto the PCB indicating pin connections. This is what should have been printed on the bottom of the PCB (i.e. non-component side):
Setting up on old version of Raspbian
These steps are not needed on new versions of Raspbian (where /boot/overlays/pcf2127-rtc-overlay.dtb exists) and are only required for those who want to use the RasClock with an older version of Raspbian. First make sure you have up to date firmware on your SD card. You can download the firmware from GitHub or use Hexxeh’s easy updater tool.
Currently the module requires a driver that is not in the standard Raspbian distribution. The source code is available to build yourself (for both 3.2.27 and 3.6.11), or you can use the binary package we provide.
To install using the binary package you'll need to run the following commands on the Raspberry Pi:
wget http://afterthoughtsoftware.com/uploads/linux-image-3.2.27-atsw-rtc_1.0_armhf.deb
dpkg -i linux-image-3.2.27-atsw-rtc_1.0_armhf.deb
cp /boot/vmlinuz-3.2.27-atsw-rtc+ /boot/kernel.img
http://www.nxp.com/products/interface_and_connectivity/real_time_clocks/rtcs_with_temp_compensation/PCF2129T.html
There is also an updated version of the binary package (3.6.11).
Latest kernel support
The latest build of the RasClock driver is now available from our site. We supply the full deb (.deb) image or just the kernel module (.ko). If using the kernel module you must make sure that:
- your current kernel is built using the armhf compiler
- you choose the correct version for your kernel version.
To install using the binary package you'll need to run the following commands on the Raspberry Pi:
wget http://afterthoughtsoftware.com/uploads/linux-image-3.6.11-atsw-rtc_1.1_armhf.deb
dpkg -i linux-image-3.6.11-atsw-rtc_1.1_armhf.deb
cp /boot/vmlinuz-3.6.11-atsw-rtc+ /boot/kernel.img
To configure Raspbian to load the driver at boot, add the following lines to /etc/modules (for the latest kernels and kernel modules use rtc-pcf2127 instead of rtc-pcf2127a):
i2c-bcm2708
rtc-pcf2127a
To register the module at boot time and set the system clock from the RTC, add the following to /etc/rc.local for Rev1 boards:
echo pcf2127a 0x51 > /sys/class/i2c-adapter/i2c-0/new_device
( sleep 2; hwclock -s ) &
For Rev2 boards:
echo pcf2127a 0x51 > /sys/class/i2c-adapter/i2c-1/new_device
( sleep 2; hwclock -s ) &
When the inserted module is called rtc-pcf2127 instead of rtc-pcf2127a:
echo pcf2127 0x51 > /sys/class/i2c-adapter/i2c-1/new_device
( sleep 2; hwclock -s ) &
After you reboot the Raspberry Pi, you should be able to access the module using the hwclock command.
Comments
blog comments powered by Disqus